
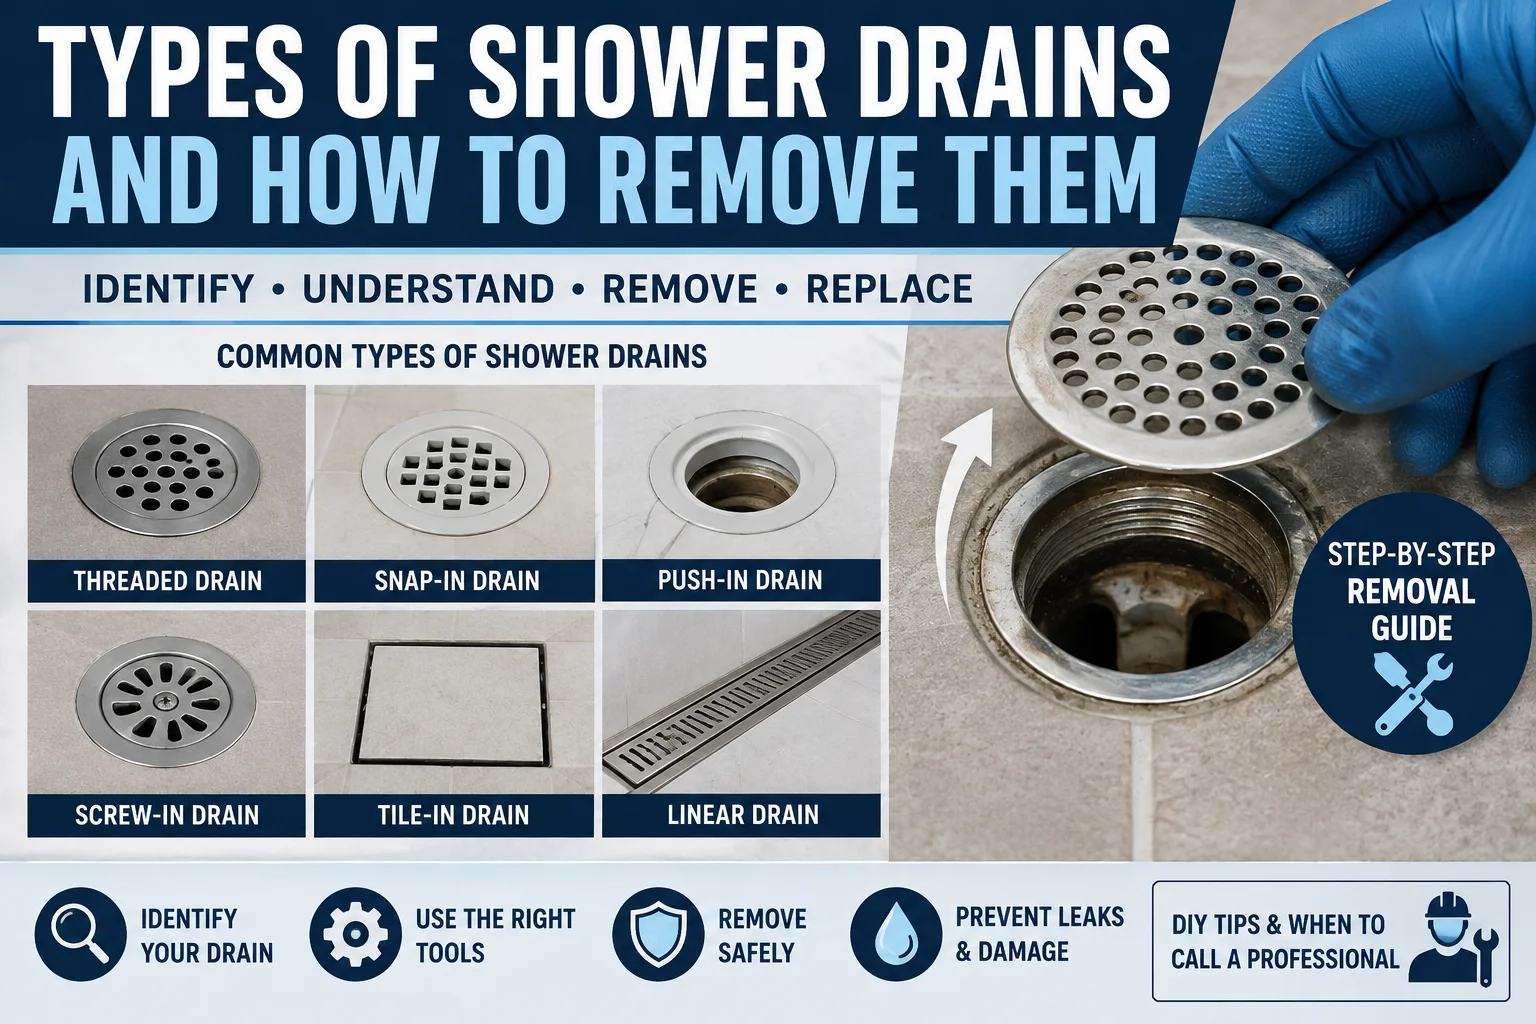
Shower drains aren’t all built the same way, and that’s usually the first thing homeowners discover when they try to clean, repair, or replace one. Some drains twist out with a simple tool. Others are held in with compression fittings, snap-in covers, or hidden fasteners you can’t see until you know where to look. Knowing which type you have makes removal much easier and helps you avoid damaging the shower base in the process. This guide walks through the common types of shower drains, how to identify yours, and how to remove each one safely.
What Is a Shower Drain?
A shower drain is the fixture at the bottom of a shower that collects water from the floor and channels it into the home’s drain pipe system. It’s made up of two main parts: the visible cover or grate you see when you step into the shower, and the drain body underneath, which connects to the pipe below.
These two parts matter because homeowners often only need to deal with the cover, not the entire drain body. Water flows through the grate, down into the drain body, and out through the pipe connection. Identifying which part you’re actually looking at, and which type of drain you have, is the first step before attempting any removal.
Common Types of Shower Drains
Shower drains come in several common designs. Each one connects and releases differently, so it helps to know what you’re working with before you start.
Screw-In or Threaded Shower Drain
A threaded shower drain has a body that screws directly into a fitting below the shower floor. These are common in both older and newer installations. You can often identify one by a visible ring around the drain opening with small notches or slots designed for a specialized drain removal tool. Removal generally involves turning the drain body counterclockwise to unscrew it from the fitting beneath it.
Compression Shower Drain
A compression-style drain connects using a rubber gasket or seal that’s compressed against the pipe to create a watertight fit, rather than threads. These are common in shower pans and some prefabricated shower bases. Because the connection relies on pressure rather than threading, removal can require access from underneath the shower, and the process looks different from unscrewing a threaded drain.
Push-In Shower Drain
Push-in drains are designed to seat into place with a snug, pressure-fit connection rather than screwing in. They’re often found in shower pan kits and some modern shower systems. You can sometimes identify one by the absence of visible threads or screws around the drain body. Removal usually involves carefully working the drain loose rather than turning it.
Snap-In Shower Drain Cover
A snap-in cover clips into place over the drain opening and pops off with gentle upward pressure. It’s important to understand that removing this cover only exposes the drain body underneath, it doesn’t mean the entire drain assembly has been removed. Many homeowners only need to get this far to clean out hair or debris.
Linear Shower Drain
Linear drains are the long, narrow drains often used in curbless or walk-in showers, usually running along one edge of the shower floor instead of sitting in the center. They differ significantly by manufacturer, and the grate, fastening method, and drain body design can all vary. Because these drains are often tied closely to the waterproofing membrane, removal generally calls for more care than a standard round drain.
Tile-In or Hidden-Style Shower Drain
Some drains, especially in tiled showers, are designed to blend into the floor with a tile insert or a low-profile grate that’s harder to spot. Before attempting to remove anything, it’s important to locate the actual removable grate or cover, since these designs can look like a solid part of the floor at first glance.
How to Identify Your Shower Drain Type
If you’re not sure what kind of drain you have, a close visual inspection usually gives you enough clues to move forward.
Look at the drain cover. Is it screwed down with visible fasteners, snapped into place, sitting loosely, or designed to simply lift out?
Look for visible screws. Screws around the edge of the cover often mean it’s removable, but that only tells you about the cover, not the entire drain body underneath.
Check the center of the drain. Some drains have a center screw, cap, or opening that hints at a threaded or specialty design.
Check whether the grate lifts out. A grate that lifts freely with light pressure is different from a full drain assembly that needs to be unscrewed or disconnected.
Look at the drain edge. Without disturbing anything, look closely at where the cover meets the shower floor. This can reveal whether it’s threaded, snapped in, or sealed with compression.
| What You See | Possible Drain Type | Likely Removal Method |
|---|---|---|
| Visible screws | Screw-in cover/drain | Remove screws first |
| Grate lifts out | Push-in/removable cover | Carefully lift |
| Threaded center/inner body | Threaded drain | Appropriate drain tool |
| Long narrow grate | Linear drain | Depends on manufacturer |
| No obvious removable parts | Hidden/specialty design | Check manufacturer information |
These are identification clues, not a guaranteed diagnosis. If you’re still unsure after a close look, checking the manufacturer’s documentation, if available, can confirm the design.
Tools You May Need to Remove a Shower Drain
The right tool depends entirely on the drain type. Common tools homeowners may need include:
- Screwdriver
- Adjustable pliers
- Channel-lock pliers
- Drain removal tool
- Needle-nose pliers
- Utility knife
- Flashlight
- Protective gloves
- Bucket or towel
Not every drain needs every tool on this list. Start with the basics, a screwdriver and flashlight, and add specialty tools only if your drain type calls for them.
How to Remove a Shower Drain Cover
Removing the cover is usually the easiest and safest first step, and it’s often all you need for cleaning or clearing a clog.
Screw-On Cover
- Remove the visible screws with a screwdriver.
- Lift the cover straight up and set it aside.
- Clean around the opening before doing any further work.
- Keep the screws together so you don’t lose them.
Snap-In Cover
Gently pry up on the edge of the cover, working around it evenly rather than pulling hard from one spot. Avoid using excessive force, which can crack the surrounding finish.
Lift-Out Cover
Some covers simply lift out with light pressure. Lift slowly and keep a hand nearby to catch any loose hardware so nothing falls into the drain opening.
Whatever style you have, avoid forcing a cover that isn’t budging. If it won’t move with light, steady pressure, it may be a different type than you think.
How to Remove a Threaded Shower Drain
Removing a threaded drain body takes more care than removing a cover. A general approach looks like this:
- Remove the drain cover first, if your drain has one.
- Take a look at the exposed drain body to confirm it’s threaded.
- Use a drain removal tool designed to fit into the drain’s slots or notches.
- Turn the drain body counterclockwise to loosen it.
- Work slowly, especially if the drain resists turning.
- Once loose, lift the drain body out carefully.
- Inspect the opening and the seal underneath before installing anything new.
Older threaded drains can be difficult to remove because of corrosion, hardened plumber’s putty, or mineral deposits that have built up over the years. If the drain won’t budge with reasonable effort, don’t force it. Cutting into the drain or surrounding plumbing isn’t a DIY step, so if it comes to that, it’s time to bring in a professional.
How to Remove a Compression Shower Drain
Compression drains rely on a gasket seal rather than threading, which changes how they come apart. Before attempting removal, identify whether you’re dealing with a compression fitting versus a threaded one, since the approach isn’t interchangeable.
In many cases, releasing a compression seal requires access from underneath the shower, not just from the drain opening above. Trying to force the drain out from the top can damage the gasket, the drain body, or the shower pan itself. If you don’t have access below the shower floor, this is often a job better suited for a plumber.
How to Remove a Push-In Shower Drain
- Remove the cover or grate to expose the drain body.
- Check whether the drain body itself is designed to lift or pull free.
- Use pliers or the method recommended by the manufacturer, if you can identify it.
- Work carefully around the edges of the shower base to avoid scratching or cracking the surface.
- Inspect the opening once the drain is out.
Not every drain that looks like a push-in style uses the exact same mechanism, so go slowly and stop if you feel resistance that doesn’t seem normal.
How to Remove a Linear Shower Drain
Linear drains vary a lot between manufacturers, so there’s no single universal removal method. Start by removing the grate, then look for any visible fasteners holding the drain body in place. From there, try to identify the specific drain body design, since some rely on clips, others on screws, and others on a channel system.
Because linear drains are often integrated closely with the shower’s waterproofing membrane, take extra care not to disturb that layer while working. If you can find the manufacturer or model, their specific instructions will be more reliable than a general approach.
What If the Shower Drain Is Stuck?
A stuck drain is one of the most common frustrations in this kind of project. Common causes include:
- Corrosion on metal components
- Mineral buildup from hard water
- Old, hardened sealant or putty
- Rust around threaded connections
- Cross-threading from a previous installation
- Debris trapped around the drain body
- Improper installation from an earlier repair
If your drain is stuck, try these safe steps:
- Clean away any visible buildup around the drain edge.
- Make sure you’re using the correct tool for your drain type.
- Apply steady, controlled force rather than sudden force.
- Stop immediately if you notice the shower base or tile starting to crack or shift.
- Call a plumber if the drain still won’t move after reasonable effort.
How to Remove a Shower Drain Without Damaging the Shower
Preventing damage matters just as much as getting the drain out. Keep these points in mind:
- Use the correct tool for your specific drain type.
- Protect the surrounding shower surface while you work.
- Avoid excessive force at any point in the process.
- Don’t pry aggressively against tile or acrylic surfaces.
- Don’t cut into the drain assembly without knowing exactly what’s below it.
- Be careful not to damage the waterproofing layer beneath the shower floor.
- Know when to stop and call a professional.
Waterproofing is especially important in shower installations because it prevents water from leaking into the subfloor or surrounding walls. Damaging that layer during a drain repair can lead to a much larger and more expensive problem down the road.
Do You Need to Remove the Whole Drain?
Not always. There’s a real difference between:
- Removing just the grate
- Removing the drain cover
- Removing the drain body itself
- Replacing the entire drain assembly
Many common issues, like hair clogs or debris buildup, only require removing the cover or grate. Removing the full drain body is typically only necessary when you’re dealing with leaks, damage, or a full replacement. Before assuming you need to take the whole thing apart, check whether removing just the cover solves the problem.
When Should You Replace a Shower Drain?
A few signs point toward replacement rather than repair:
- A cracked drain body
- Severe corrosion that affects the seal
- A leak that keeps coming back
- Damaged or stripped threads
- A broken or missing drain cover
- A seal that no longer holds
- A drain that doesn’t fit securely anymore
- A drain assembly that’s incompatible with your current shower setup
Any replacement drain should match your existing plumbing and shower construction, since drain types aren’t universally interchangeable.
When to Call a Plumber
DIY removal isn’t always the right move. Call a professional if:
- The drain won’t loosen no matter what you try
- The drain body looks cracked or damaged
- Water is leaking below the shower floor
- You can’t access the drain connection
- You suspect the waterproofing has been compromised
- The job requires cutting or modifying pipes
- The shower base or tile starts to crack during removal
- You can’t identify what type of drain you have
- The replacement involves work below the shower floor
Other Plumbing Problems Homeowners May Need Help With
Shower drains are just one piece of a home’s overall plumbing system. Homeowners dealing with drain issues often run into other plumbing needs too, from leaky pipes and clogged sinks to faucet repairs and even Water Heater Repair in Temecula. Knowing when to handle something yourself and when to call in help applies across most plumbing projects, not just shower drains.
Frequently Asked Questions
What are the most common types of shower drains?
The most common types are threaded (screw-in), compression, push-in, snap-in cover, linear, and tile-in or hidden-style drains. Each connects to the plumbing differently, which affects how it’s removed.
How do I know what type of shower drain I have?
Look closely at the cover and drain body. Visible screws, a threaded center, a lift-out grate, or a long narrow shape can all point toward a specific drain type. When in doubt, check manufacturer documentation if available.
How do you remove a screw-in shower drain?
Remove the cover if present, then use a drain removal tool to turn the drain body counterclockwise. Work slowly, since older drains can be difficult to loosen due to corrosion or buildup.
How do you remove a push-in shower drain?
Remove the cover or grate first, then check whether the drain body lifts or pulls free. Use pliers carefully and avoid forcing it if there’s resistance.
Can I remove a shower drain without removing the shower base?
In most cases, yes. Drain covers and many drain bodies can be removed without touching the shower base itself. Full drain replacement sometimes requires more access, depending on the installation.
What tool is used to remove a shower drain?
It depends on the drain type. A screwdriver often handles covers, while threaded drains typically need a specialized drain removal tool designed to fit their slots or notches.
Why is my shower drain stuck?
Common causes include corrosion, mineral buildup, old sealant, rust, or a previous installation issue. Cleaning the area and using the correct tool can sometimes help, but a stuck drain may need professional attention.
Can I remove only the shower drain cover?
Yes, and for many tasks like cleaning or clearing debris, that’s all you need to do. Removing the cover doesn’t mean you’ve removed the entire drain assembly.
When should I replace a shower drain?
Consider replacement if the drain is cracked, corroded, leaking persistently, or no longer fits securely. A drain with damaged threads or a broken cover is also a sign it may be time for a new one.
Should I call a plumber to remove a stuck shower drain?
If the drain won’t loosen with reasonable effort, appears damaged, or removal would require cutting into pipes, calling a plumber is the safer choice to avoid further damage.
Conclusion
Shower drains come in several different designs, and identifying which type you have is the first step before attempting any repair. Removing a cover is usually far simpler than removing the entire drain body, and threaded, compression, push-in, and linear drains can all require different approaches. Avoid using excessive force, since the shower base, waterproofing, or surrounding plumbing can be damaged in the process. When a drain is stuck, leaking below the shower, or requires plumbing modifications, it’s best to call a professional rather than risk further damage.